How to use the site
First, "Member Registration"!
Please register as a member (no registration fee or annual fee) when using the reservation service on this website. By registering as a member, you can use all services free of charge. To register as a member, please follow the steps below.
New Member Registration
Step 1 | Click the Register button

Click the Member Registration button in the site menu at the top of each page in this site.
Step 2 | Send a tentative registration e-mail
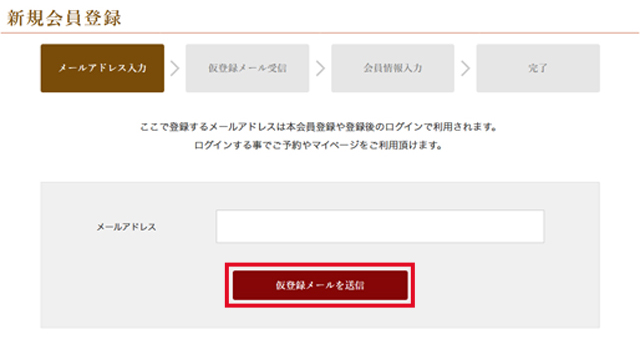
A page for entering your e-mail address will appear. Please enter your e-mail address and click the "Send temporary registration e-mail" button.
The e-mail address you register here will be used for this membership registration and login after registration.
Please set up your e-mail settings so that you can receive e-mails from "@gntamami.jp".
It often happens that customers using carrier email (docomo, au, softbank) do not receive membership registration or reservation confirmation emails. "@gntamami.jpPlease set up your e-mail settings so that you can receive e-mails from
Step 3|Temporary registration completed. Please check your e-mail.
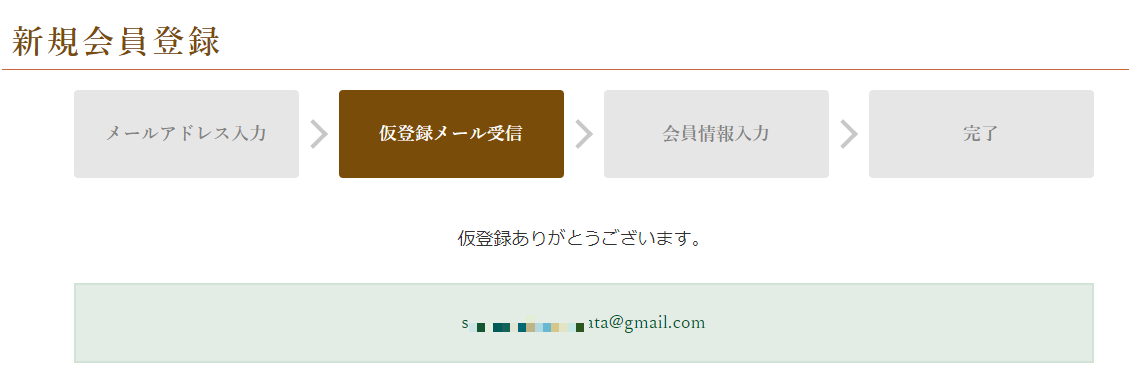
When you see the message "Thank you for your temporary registration. message and the email address you entered are displayed, your temporary registration is complete.
A temporary registration completion e-mail will be sent to the e-mail address you entered.
At this point, the member has not yet completed the full registration process.
What if I don't receive my email?
Please make sure that the email address you entered is correct.
Please wait 60 seconds.
If your e-mail address is a carrier e-mail address (docomo, au, softbank, rakuten, etc.), please make sure that your e-mail address is set to receive e-mails from @gntamami.jp.
If you are unable to confirm receipt, we apologize for the inconvenience.Inquiry FormWe will investigate and report back to you.
Step 4|Click the URL
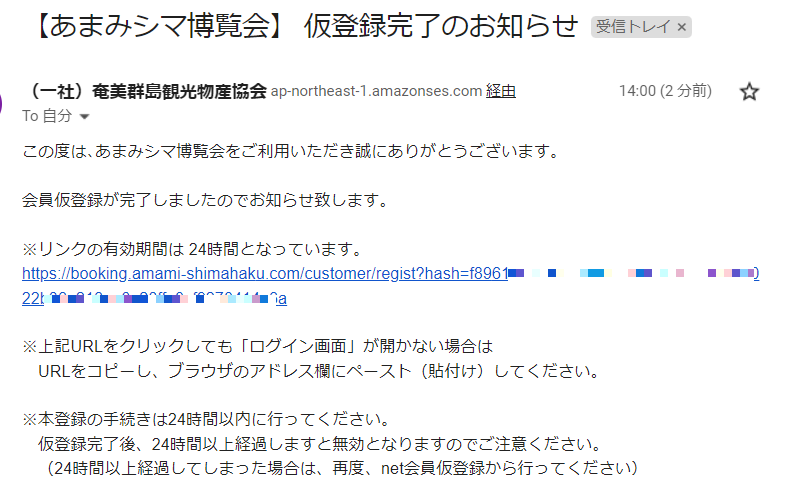
Complete the membership registration process.
A temporary registration completion e-mail will be sent to the e-mail address you entered.
Clicking on the URL in the e-mail will take you to the member registration page.
Step 5|Enter registration information
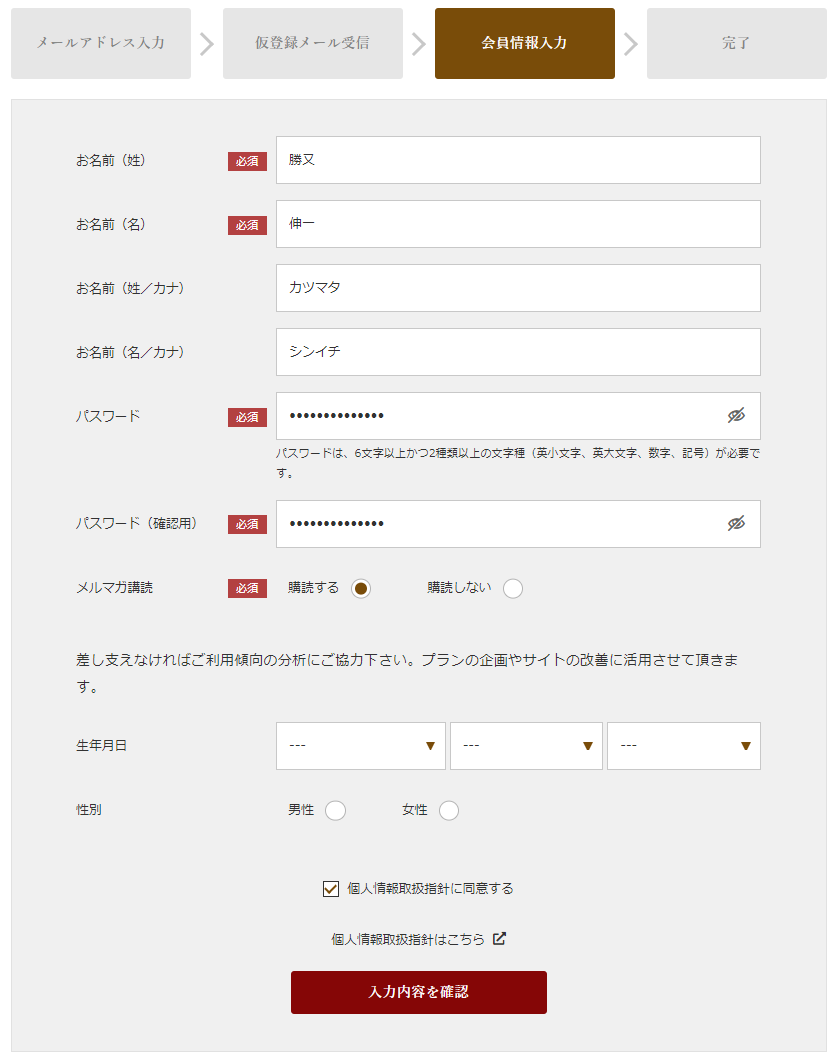
When the member registration page appears, fill in the required information in the form, agree to the personal information handling guidelines, and click the "Confirm" button.
[Notes.
The information you enter here is important and required to use our services. Please enter the information accurately.
Step 6|Click the Register button
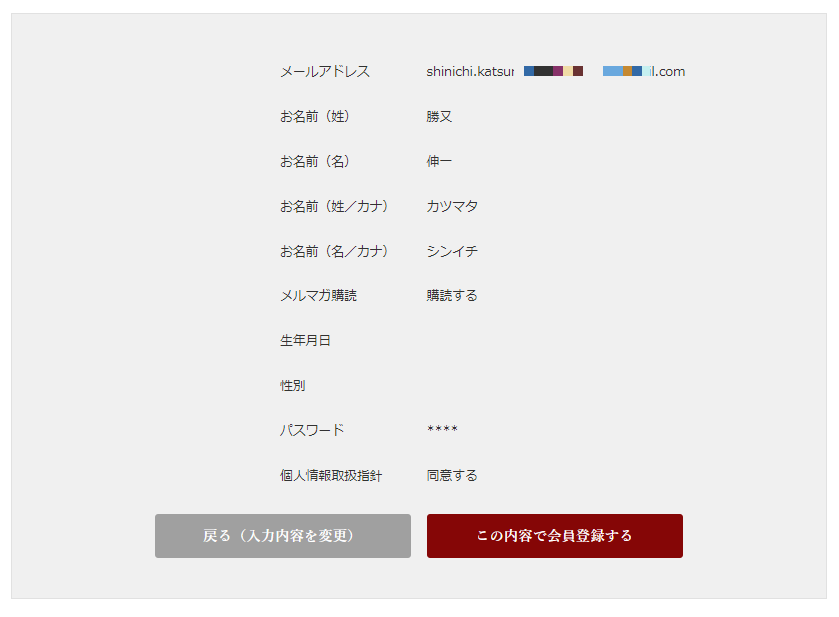
This is the final confirmation screen for "Member Registration.
At this stage, the membership registration is not yet complete. Please reconfirm the information you have entered and press the "Register with this information" button.
If you wish to change the information you have entered, click the "Back (change entered information)" button to return to the information entry form, correct the necessary information, and then click the "Register as a member with this information" button.
Step 7|Complete registration
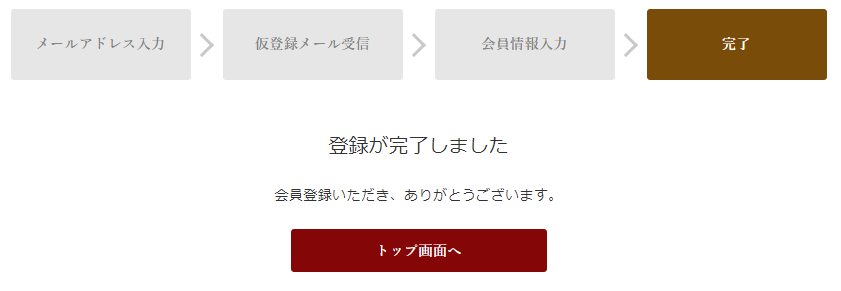
The "Registration Complete" page will appear.
A "Notice of Completion of Membership Registration" will be sent to the e-mail address you entered in the temporary membership registration.
At this point, you are officially registered as a member.
Please use the service in compliance with the Terms of Use.
Let's make a reservation!
After registering as a member, please follow the steps below to make a reservation on our website.
About Reservations
Step 1 | Search
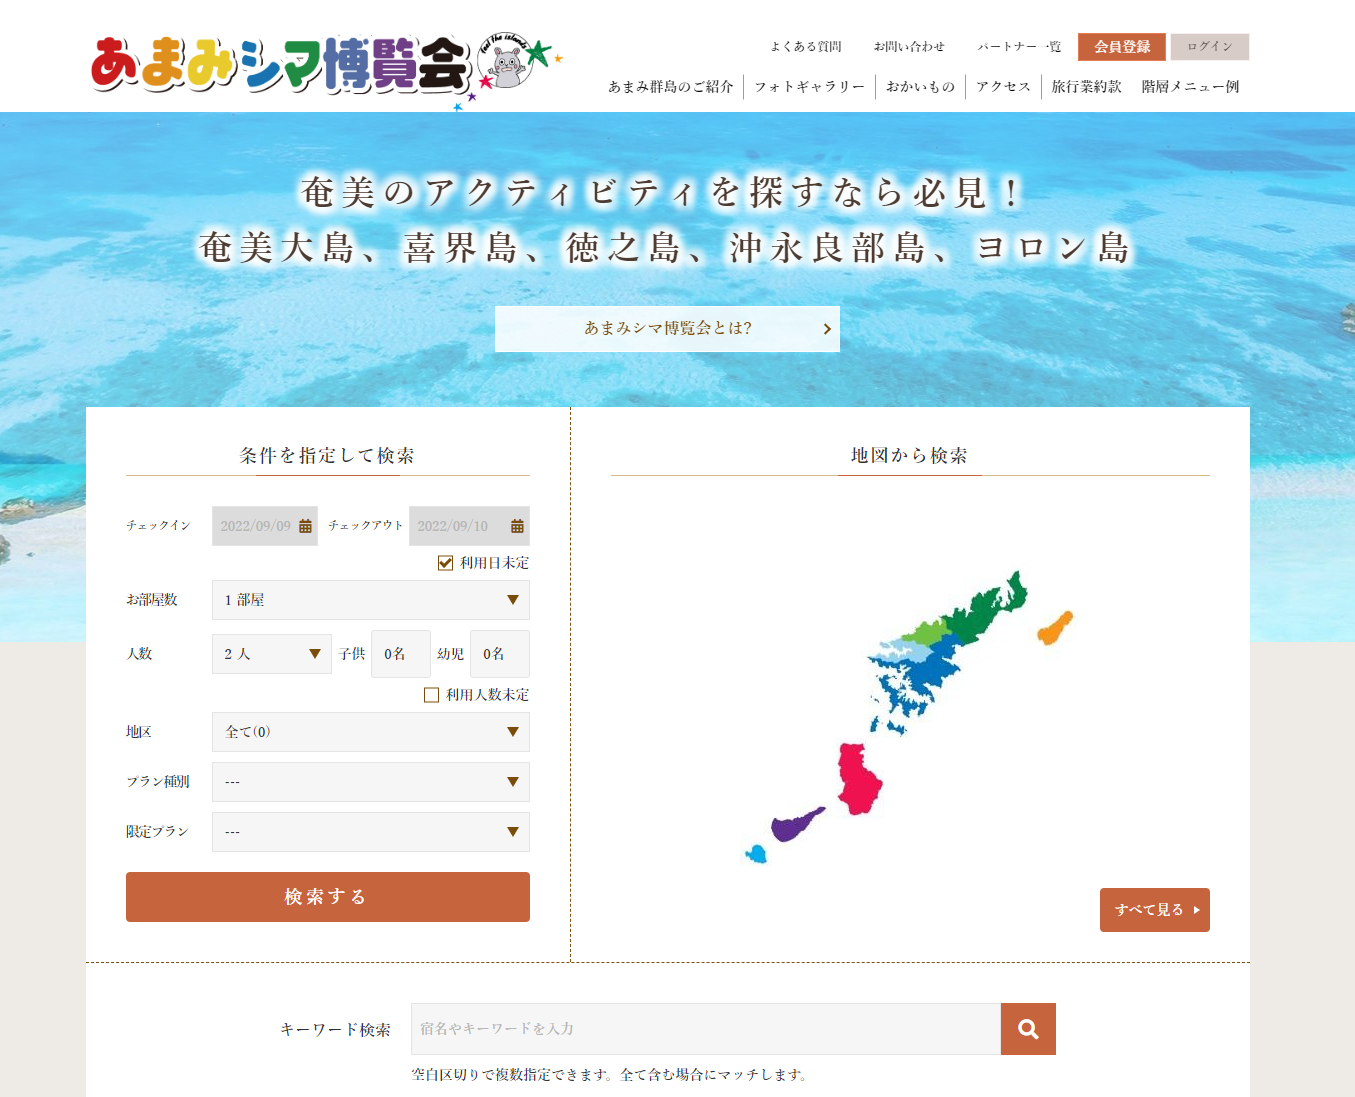
Please use the following search function on the TOP page to search for accommodations.
≪Find accommodations≫.
If you are looking for a place to stay, please click here.
Search for accommodation plans that match your criteria.
≪Find a plan to experience...
If you are looking for a place to stay, please click here.
Search for an experience plan that matches your criteria.
≪ Keyword Search≫.
Please enter keywords such as inn name, business name, plan name, etc.
Step 2|Check information
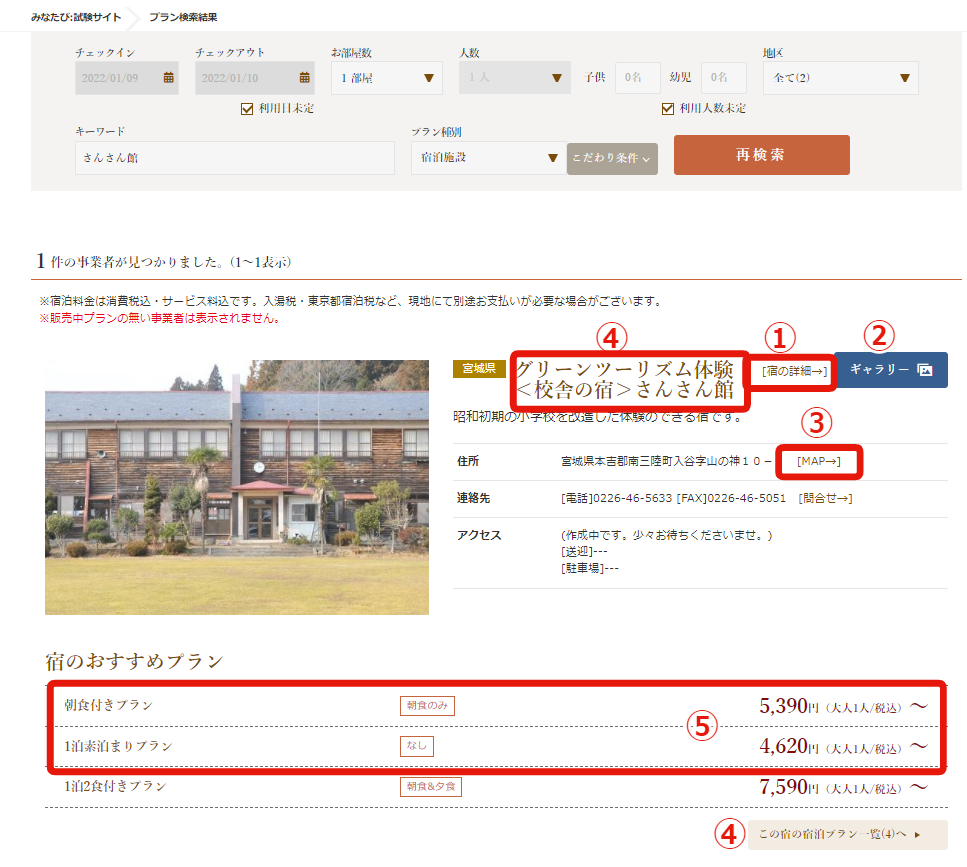
The search results list page will be displayed.
Click on one of the menu items for the businesses selected by the search criteria.
(The page displayed will vary depending on the menu you click on.)
(1) "Details →" ⇒Go to Step 3
(2) "Gallery" ⇒Go to Step 4
(3) "MAP→" ⇒Go to Step 5
(4) "Inn name" and "To the list of plans of this inn" ⇒⇒ "To the list of plans of this inn" ⇒ "To the list of plans of this innGo to Step 6.
(5) When recommended plans are displayed, you can also click on the plan of your choice. ⇒ Click on the plan of your choice.Go to Step 7.
Step 3|Detailed information about the business
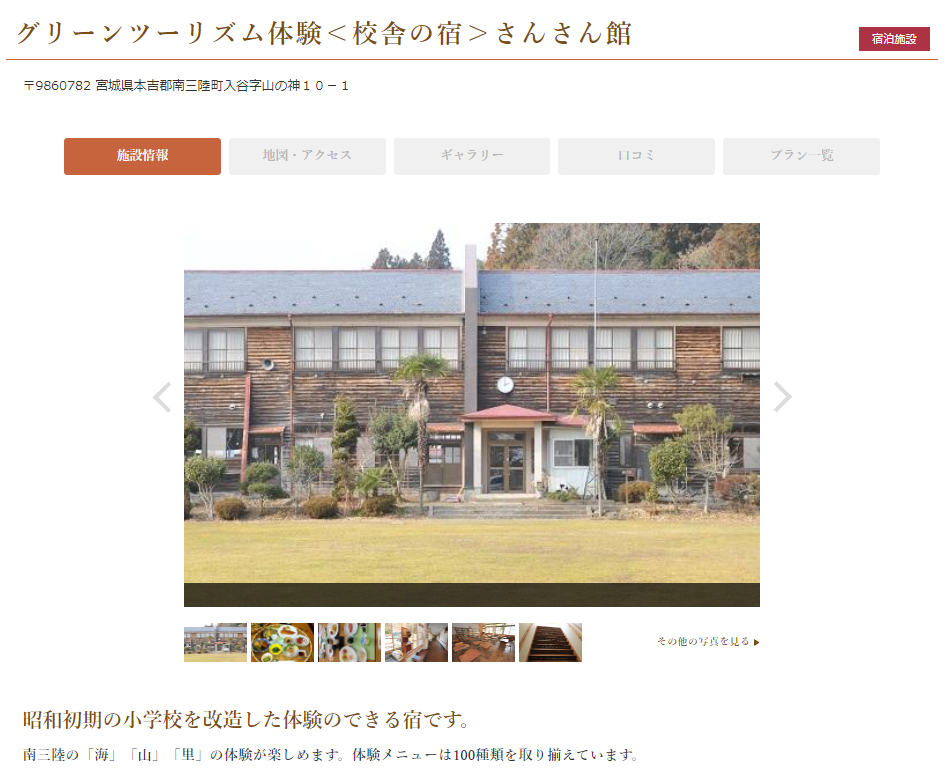
Individual detail pages of the target businesses will be displayed.
Step 4|Gallery
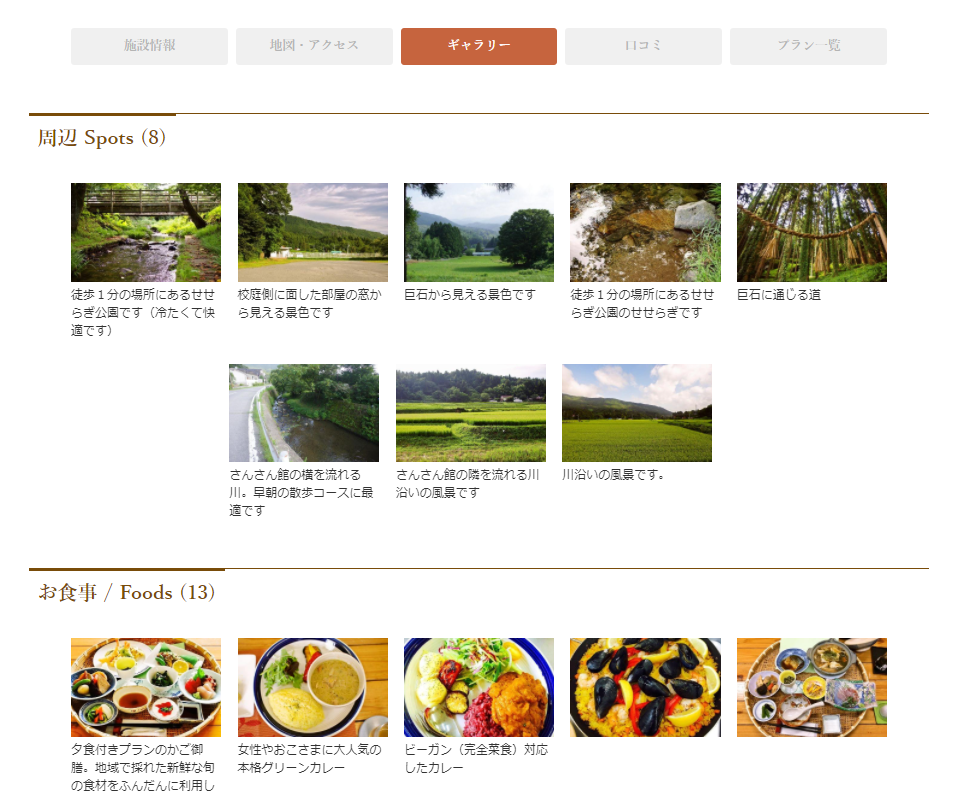
Images of the building, food, and services registered by the business are displayed in a list.
Click on the image to see it in a larger size.
Step 5|Access
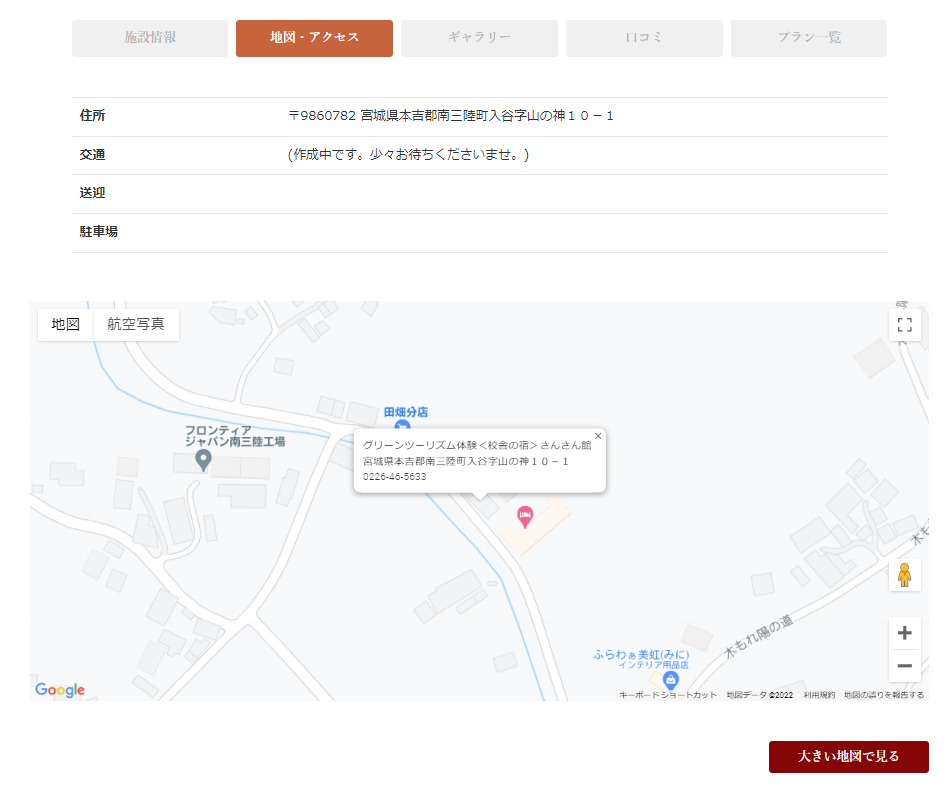
The business's address, map, and traffic information will be displayed.
The map can be found on Google Maps.
Step 6
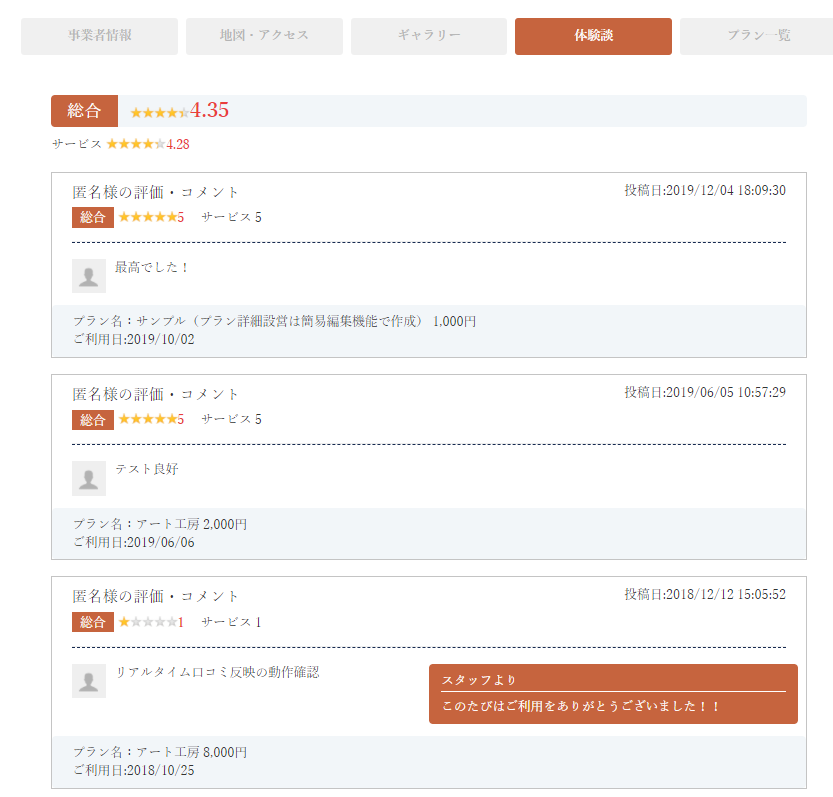
A list of testimonials from customers who have used the plan will be displayed.
Step 7|List of Plans
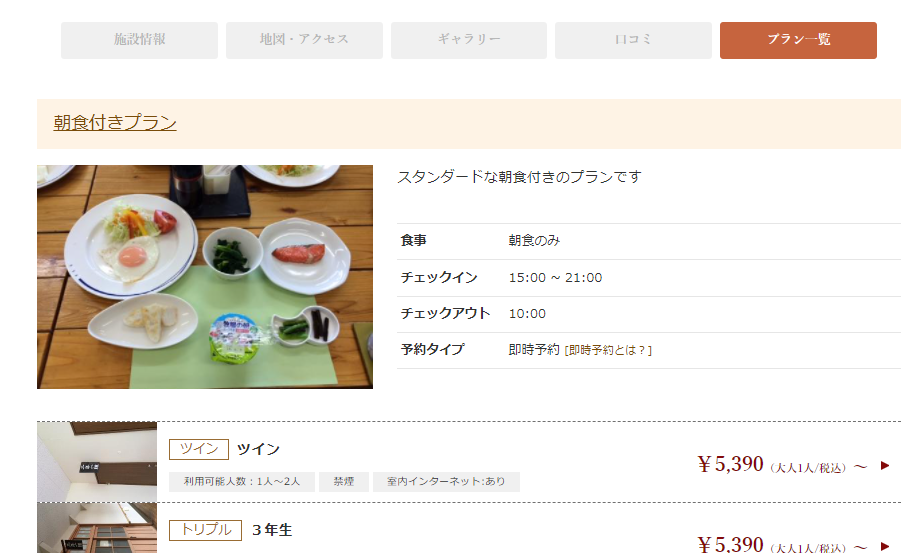
A list of available reservation plans will be displayed.
Step 8|Plan Details
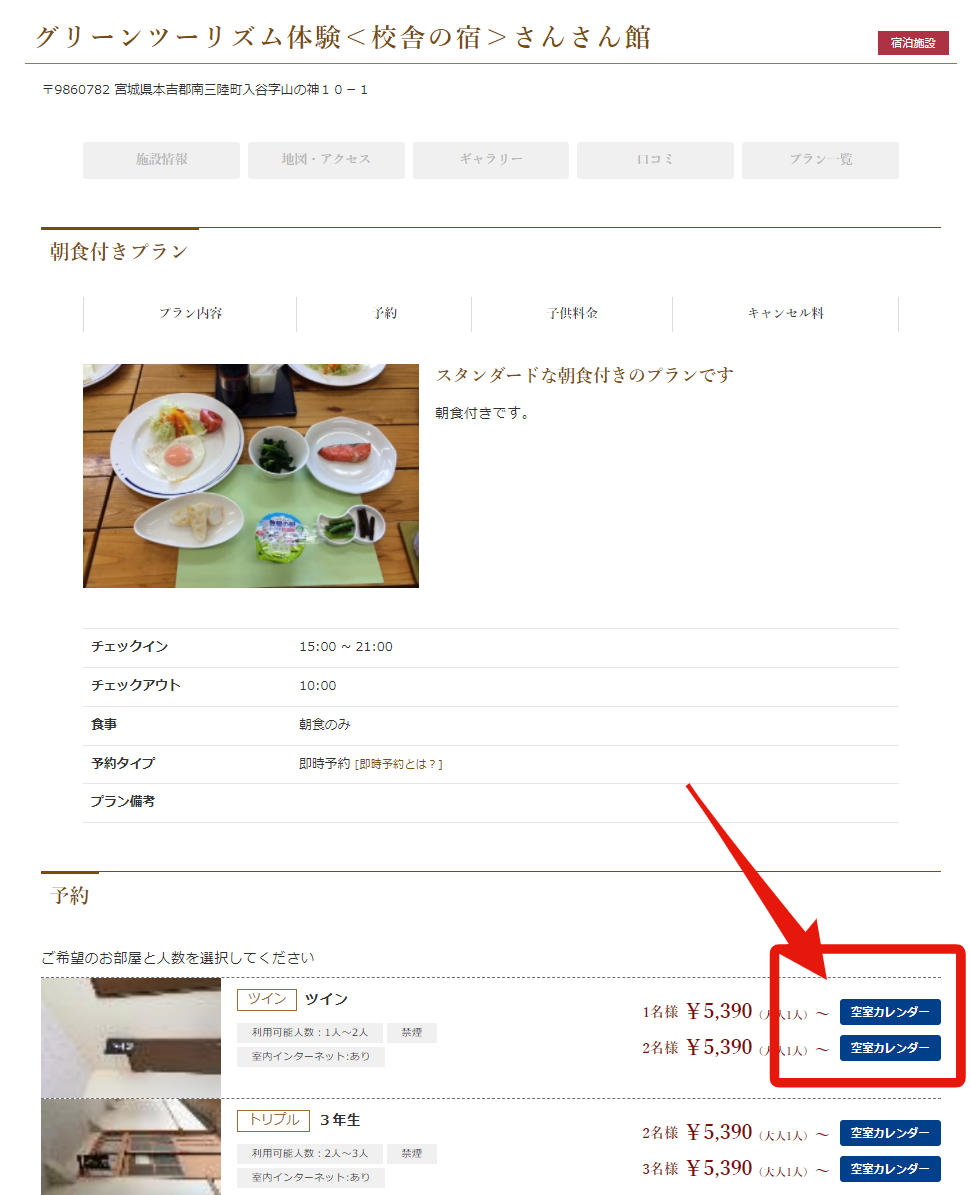
The detail page for the selected plan will be displayed.
You can also check about child fees and cancellation fees.
Click on "Availability Search Calendar."
Step 9|Select the date of use
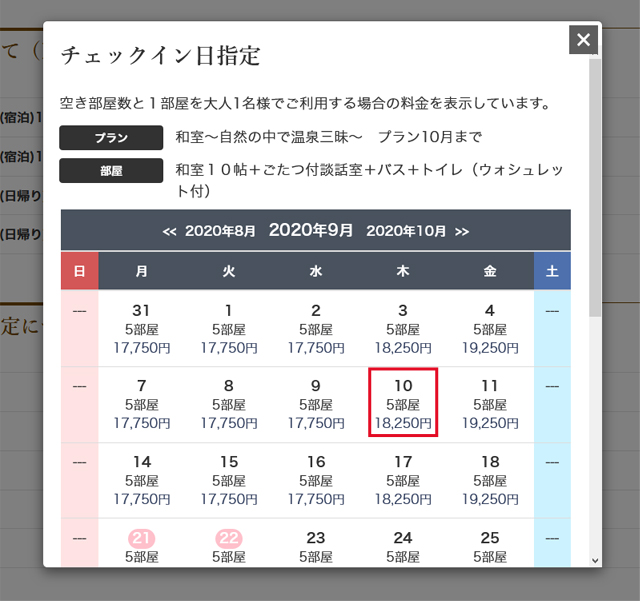
Click on the date of your choice.
Step 10|Select reservation details
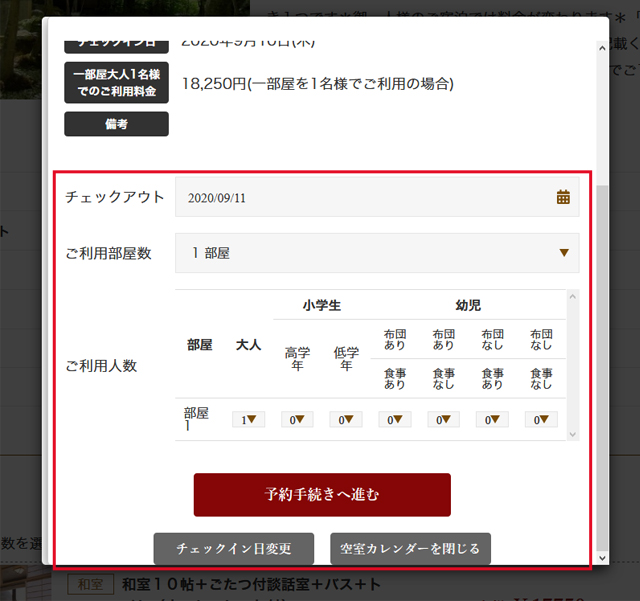
Select the number of people and other conditions of use, and click the "Proceed to Reservation Procedure" button.
Step 11|Log in
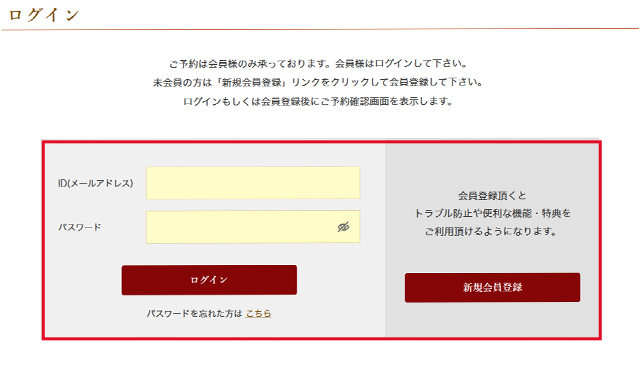
The member login screen will appear. Enter your ID/password and click "Login".
If you are already logged in, the login screen will not appear, so please proceed to Step 11.
Step 12|Enter reservation information
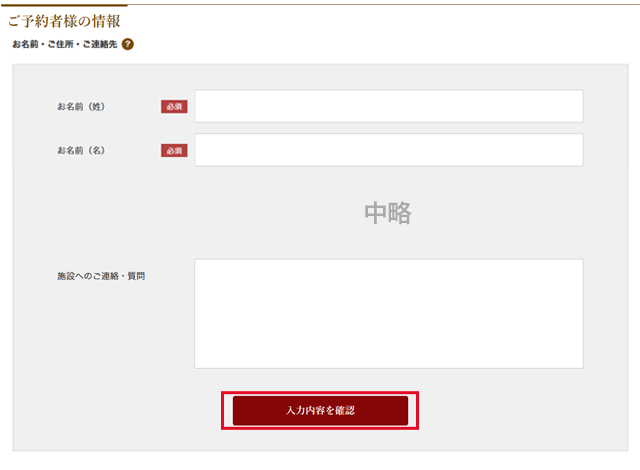
Detailed information about the selected plan and the person making the reservation will be displayed.
Please enter your reservation information.
When all entries are complete, click the "Confirm Entries" button.
Step 13|Final confirmation
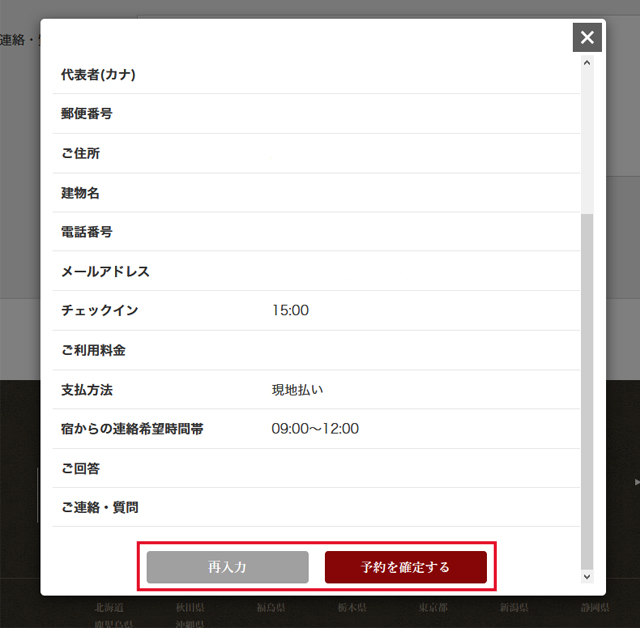
This is the final confirmation screen for "Reservation.
At this stage, the reservation application (including inquiries) has not yet been completed.
Please reconfirm the information you entered and press the "Confirm Reservation" button.
If you want to change the information you entered, click the "Re-enter" button to return to the information entry form, correct the necessary information, and then click the "Confirm Reservation" button.
Step 14|Completion of Reservation
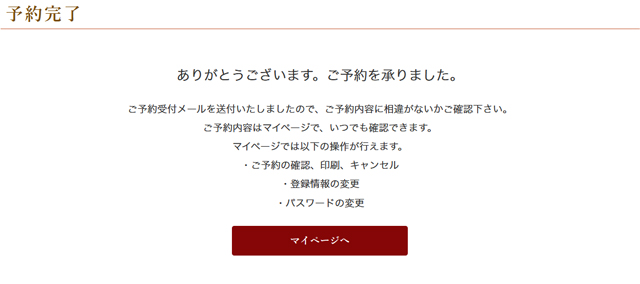
The reservation application completion screen will be displayed.
We will later send a confirmation e-mail to the e-mail address you entered when you registered.
You can check your reservation details from "Member My Page".
[Payment of Fees]
Fees can be paid "on site" or by credit card. We recommend that you bring a copy of your "Reservation Confirmation E-mail" or "Reservation Status Inquiry" screen with you to avoid any misunderstandings during payment.
Cancellation of Reservations
Cancellation of ReservationsIf you wish to cancel your reservation for unavoidable reasons, you must follow the cancellation procedures.
To cancel a reservation, please go to "My Page" and follow the cancellation procedure.
However, due to site procedures, as a rule, same-day cancellations cannot be processed from the site. Please contact the accommodation facility or business from the customer.
To cancel your reservation, please follow the steps below.
How to Cancel a Reservation
Step 1 | Click My Page

Click on My Page.
If you are not logged in, please click Login and go to My Page.
Step 2|Click the reservation number
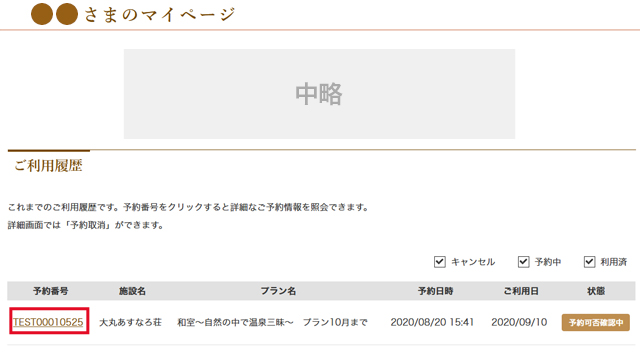
You can see a list of your reserved plans in your My Page Usage History.
To cancel, click on the reservation number.
Step 3|Confirmation of reservation details
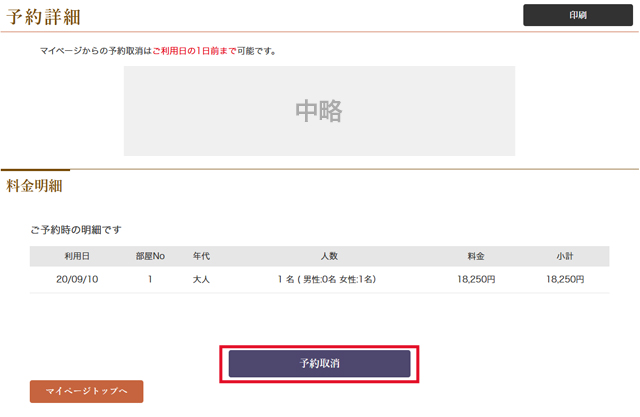
Reservation details will be displayed.
Please click the "Cancel Reservation" button after confirming the change or cancellation of your reservation.
Reservations cannot be changed. If you wish to change your reservation, please cancel your reservation and then make a new reservation.
Step 4|Final confirmation of reservation cancellation
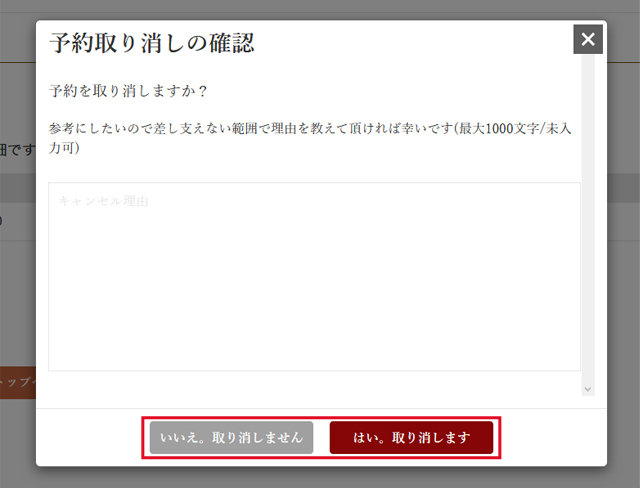
A final confirmation of reservation cancellation will be displayed.
Click the "Yes, I cancel" button to cancel, or "No, I do not cancel" button to not cancel. No, I do not cancel" button if you do not want to cancel.
You may also enter a reason for cancellation.

